.NET Power Tip 6: Presenting in Visual Studio (Presentation Mode & ToolBox Snippets)
This blog post covers a few tips for holding presentations that include some activity in Visual Studio, such as live coding. It explains how to switch VS into presentation mode with a single command and how to store your code snippets in the toolbox.
In about 80% of the presentations that I have witnessed so far, as soon as the presenter switched to Visual Studio it became very hard to follow because the font size of the text and menus was far too small. Remember that even if you, as a presenter can read it without any problem, the people in the back seats who might as well suffer from less clear eyesight, will not be able to read it and therefore not follow your explorations.
What can you do about that?
MAKE IT BIGGER!
The following section shows a couple of possibilities how to tackle the problem.
Use PresentON / PresentOFF from the Visual Studio PowerTools
First, go to TOOLS –> EXTENSIONS AND UPDATES and install the Productivity Power Tools for your edition of Visual Studio.
You can then navigate to the Quick Launch Window (Ctrl-Q) in the top right corner and use the PresentON and PresentOFF Commands to make EVERYTHING bigger. That includes menus, tab headers, text editors, tool boxes, etc.
Using the PresentEdit command you can even modify the presentation mode settings and adjust the font family and sizes to your needs. In the picture below I adjusted font size for menus to 14 and for text editors to 18.
Use Window Layouts in Visual Studio 2015
VS2015 allows you to save a window layout via WINDOWS –> SAVE WINDOW LAYOUT. You can prepare different window layouts to be used for working and for presenting. It is even possible to switch from one layout to another by using a keyboard shortcut.
Check out these links for more information on window layouts:
http://geekswithblogs.net/WinAZ/archive/2015/04/16/visual-studio-2015-custom-window-layouts.aspx
If you don’t have VS2015 yet, you can achieve the same features with a tool called Layout’O’Rama:
https://rvduren.wordpress.com/2015/06/15/multiple-window-layouts-in-visual-studio/
Use a Lower Resolution
Whenever I am presenting myself, I tend to use a very low resolution, even if the beamer supports the high resolutions that are common nowadays. Switching to a low resolution leads to everything in Visual Studio being bigger. It can be hard to perform the demo due to the lack of space, but if you already prepare your demos on a low resolution setting, it works like a charm. Your audience will appreciate you working a bit harder for them to see what you are doing.
Use a Magnifier
Use a magnifier tool whenever you need to show something that you just couldn’t make bigger. Windows has a built-in magnifier, that you can open using and close using the [Win – +] and [Win – -] shortcuts. However, using a magnifier is no excuse to not make stuff as big as possible. Fiddling around too much in the magnifier can be very annoying.
Scrolling
When coding in the text editor, collapse all the tool windows and use ZOOM, (Ctrl-Mousewheel) to make the text BIG. When preparing your session, keep your lines shorter as usual!
Full Screen Mode
Switch to full screen mode (Shift-Alt-Enter on my machine, check you settings) or VIEW –> FULL SCREEN to avoid distraction by the tool windows.
Use the ToolBox for Code Snippets
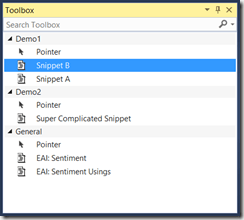
Very often in a coding demo, you want to insert prepared snippets. I often see people switching to a text file in notepad and copy pasting stuff from notepad to visual studio. However, there are better solutions. Of course, you could use the code snippet functionality built into Visual Studio. But, I think I know a better alternative: Just use the toolbox. When preparing your demo, just mark a section of code and drag it onto the toolbox.
You can then rename it and give it a good name. By right clicking on the toolbox you can even create multiple tabs to structure your code snippets:
During the demo, you just open the toolbox, grab the snippets and insert it into the text editor, you don’t even have to change windows.


0 Comment